Outlook has powerful features for creating custom views into your task list. To show you how to do this (and to support special TRO views) we will customize the built-in Simple List. Then we will create your All Categories list, which is your main, auto-prioritized list of tasks.
Customizing a View
Example: customizing the Simple List:
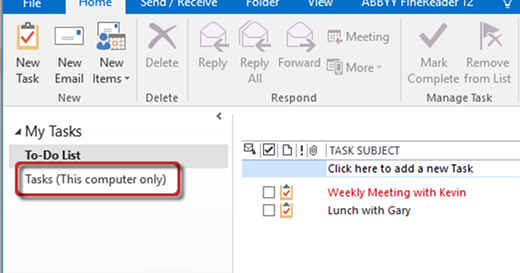
- Press Ctrl+4 to open the Tasks view.
- Click Tasks (left pane).
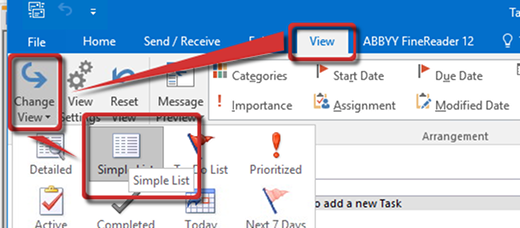
- Click View (top menu), Change View, then Simple List. This changes your view to the Simple List.
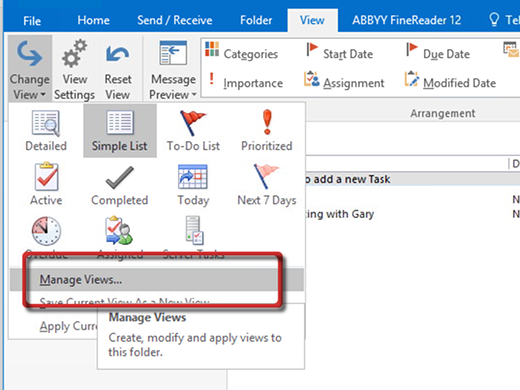
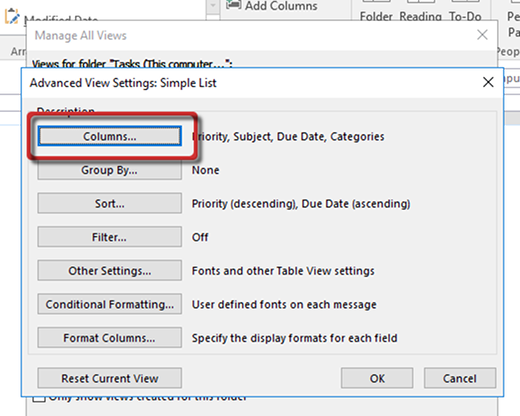
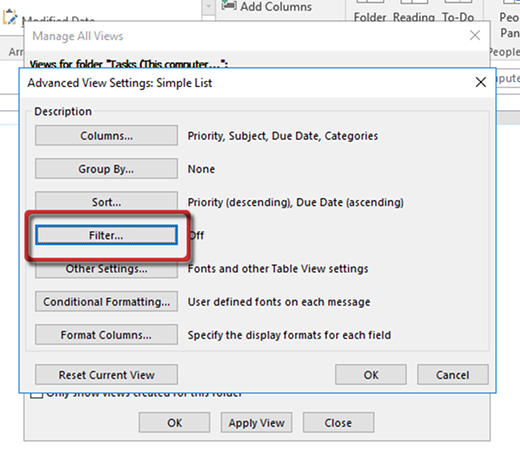
- Click Change View, then Manage Views (Alt+V, C, V, M).
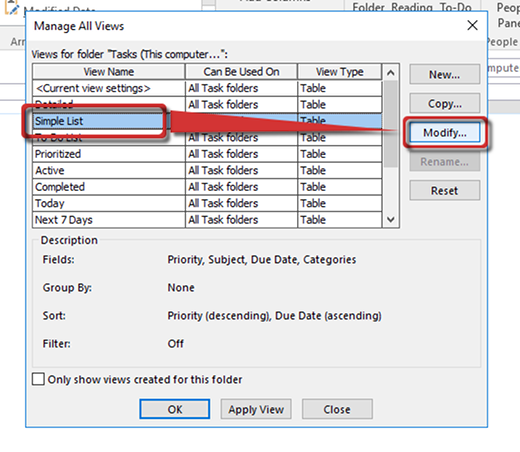
- Click Simple List, and then Modify.
- Click Columns (pop-up).
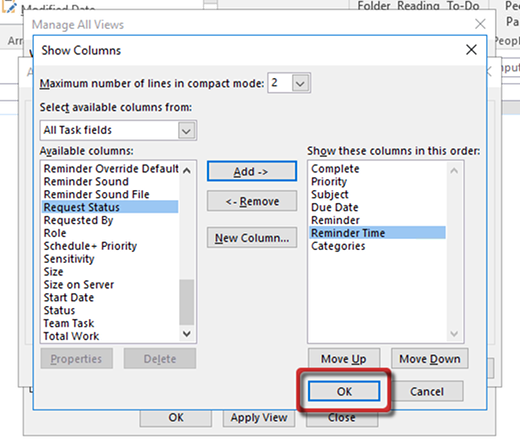
- Set Select available fields from: to All Task fields (this just helps you choose the fields you want).
- In Show these columns in this order:, add and remove fields until only the following are listed below, in this order:
- Complete
- Priority
- Subject
- Due Date
- Reminder
- Reminder Time
- Categories
- Click OK.
- Set Group By… to None.
- Click Group By…, then uncheck Automatically group according to arrangement.
- Click OK.
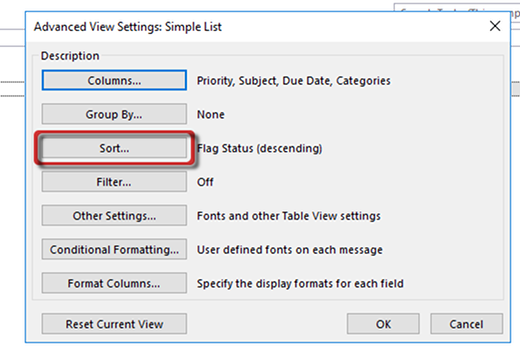
- Click Sort.
- Select the following sort order:
- Sort items by Priority, Descending
- Then by Due Date, Ascending
- All others should be (none)
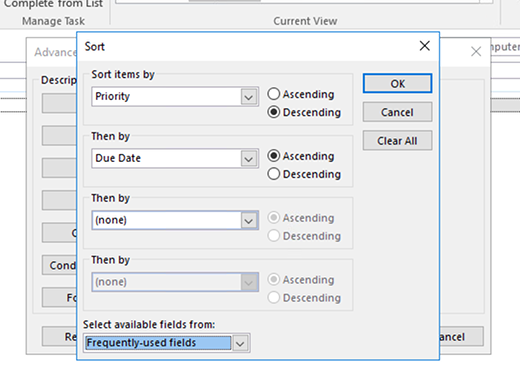
- Click Ok.
- Click Filter.
- Click SQL tab (top), then check Edit these criteria directly. All other tabs will be unavailable.
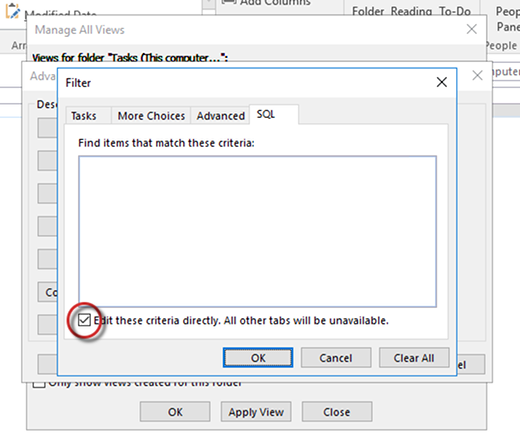
- Highlight the following text (be careful to highlight everything, including the parentheses). Then copy it (right-click, then choose Copy):
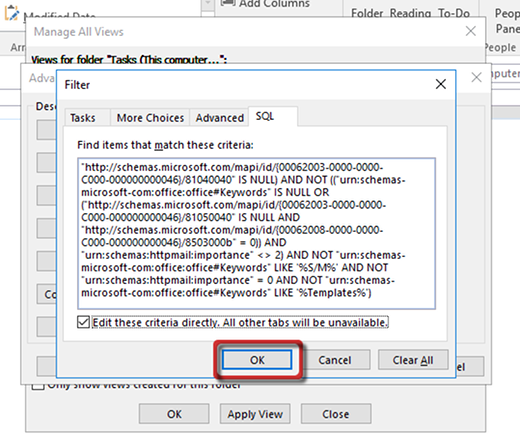
("https://schemas.microsoft.com/mapi/id/{00062003-0000-0000-C000-000000000046}/811c000b" = 0 AND ("https://schemas.microsoft.com/mapi/id/{00062003-0000-0000-C000-000000000046}/81040040" <= 'today' OR "https://schemas.microsoft.com/mapi/id/{00062003-0000-0000-C000-000000000046}/81040040" IS NULL) AND NOT (("urn:schemas-microsoft-com:office:office#Keywords" IS NULL OR ("https://schemas.microsoft.com/mapi/id/{00062003-0000-0000-C000-000000000046}/81050040" IS NULL AND "https://schemas.microsoft.com/mapi/id/{00062008-0000-0000-C000-000000000046}/8503000b" = 0)) AND "urn:schemas:httpmail:importance" <> 2) AND NOT "urn:schemas-microsoft-com:office:office#Keywords" LIKE '%S/M%' AND NOT "urn:schemas:httpmail:importance" = 0 AND NOT "urn:schemas-microsoft-com:office:office#Keywords" LIKE '%Templates%') - Be careful to highlight everything, including the parentheses.
- Paste (Ctrl+V) the text into the SQL tab, replacing all existing text. (EACH TIME YOU DO THIS, VERIFY that the correct text was pasted. For some reason, copy/paste does not always work reliably at this point, and some users paste the text from prior custom views, which makes them work improperly.)
- Click OK.
- If you get an error message when exiting the filter, you probably entered something incorrectly. Repeat the steps and try again. Make sure you copy ALL of the SQL text, including quotes and parentheses.
- Standardize the Other Settings.
- Turn off red highlights.
- Add a Group By box.
- Resize the columns as needed.
Your Simple List is now fully customized for TRO (but keep reading below). You can use steps like this to customize any view in Outlook.
Create a Custom View from Another View
We will use the Simple List to Create a permanent, All categories view:
- Go back to the Task view manager.
- Click Simple List, then Copy.
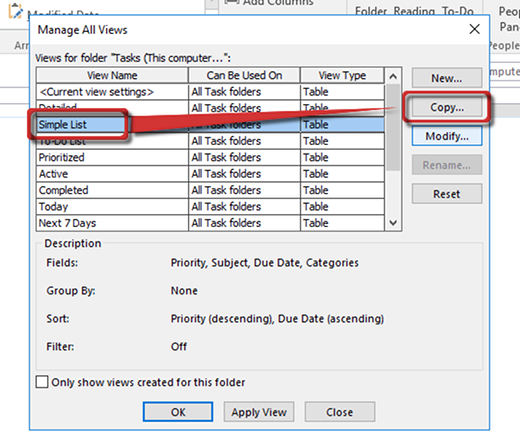
- Name the new list All Categories.
- Select This folder, visible only to me, (or This folder, visible to everyone if you are using Exchange Server).
- Click OK.
- Click OK (exit Advanced View Settings window).
- Click Apply View.
Use steps like this to create new custom views from any view you want.
Recent Comments