Set up your Google Calendar as follows:
- Sign up for Google Calendar if you have not already done so.
- Click
 (upper right).
 - Select Settings.
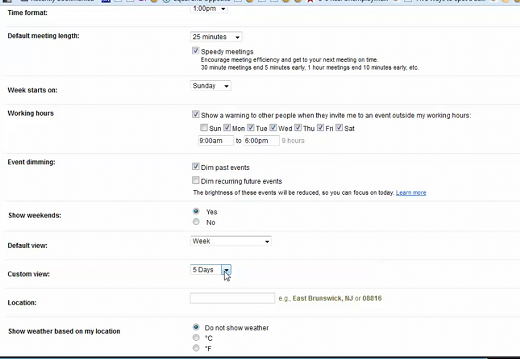
- On the General tab:
- Set these General options: Language, Country, Your current timezone, Date format, Time format, Default meeting length.
- If you work on two different timezones frequently, you can Set an additional timezone by clicking Show an additional timezone and check Display all timezones.
- To encourage meeting efficiency, check Speedy meetings
- Set Week starts on.
- Check Dim past events but not Dim recurring future events.
- Show weekends: Yes.
- Default view: Week.
- Custom view: 5 days.
- Show weather based on my location: Do not show weather.
- Show events you have declined: No.
- Automatically add invitations to my calendar: Yes.
- Enable keyboard shortcuts: Yes.
- Click Save.
- On the Calendars tab: unsubscribe from unneeded or duplicate calendars (see multiple calendars note below), Subscribe to the Holidays calendar for your location.
- On the Mobile Setup tab: set up your phone for SMS (TXT alerts) if you want them and have unlimited texting on your phone plan. Click Save.
Google’s multiple calendar feature is optional. Do not use it at first—put all your appointments into one calendar. Later, when you create your strategic calendar, you may use multiple “calendars” to manage different life areas in different colors. if you do that, make sure all your Google “calendars” are enabled at once (click their names so the calendar name appears with a solid, color background). This overlays your appointments into a single timeline so you don’t double-schedule your time.
Set Up SMS Reminders for Google Calendar (Optional)
You can have Google Calendar send you SMS (text message) reminders about appointments. To this, you’ll first need to set up your Google Calendar to text your phone.
- Open your Google Calendar.
- Click “Settings” at the top of the page.
- Choose the “Mobile Setup” tab.
- Enter your country, phone number, and carrier.
- Click to send the verification code. This will send a text message to your phone.
- Enter the verification code to complete the setup.
If you don’t receive your verification message, it is possible that your cell plan does not allow text messaging. In fact, some carriers allow you the option to block all text messages. Only your carrier can fix this.
A page will appear, asking how you would like notifications of meeting changes sent to you. We recommend that you receive most appointment notifications and changes via email rather than SMS (text) because your cell carrier will charge the normal rate for each text you receive (usually around 10 cents per message).
Your cell carrier may charge you for each text message you receive (5 to 10 cents per message). Check with your carrier.
After you save those changes, it will take you to your calendar’s notification options. You may want to leave your default reminder as just a pop-up window. Receiving text messages for every appointment in your day could quickly become costly (unless your phone plan includes unlimited text messaging, in which case knock yourself out).
Recent Comments